Wednesday, December 9, 2015

How to Paint a Resin Seat with Molded In Belts

Hi Guys,

This tutorial will show you how I paint resin seats with molded in harnesses.

Lots of modelers hate dealing with fussy photoetched belts. Tiny parts, stiff metal belts that require repeated bending and fitting to allow the harness to drape naturally. The pre-colored belts look really amazing on the fret, but anyone who has tried their hand at installing these knows that you have to take great care not to bend them too much, as the paint will flake off. This makes installing natural looking belts even more difficult.

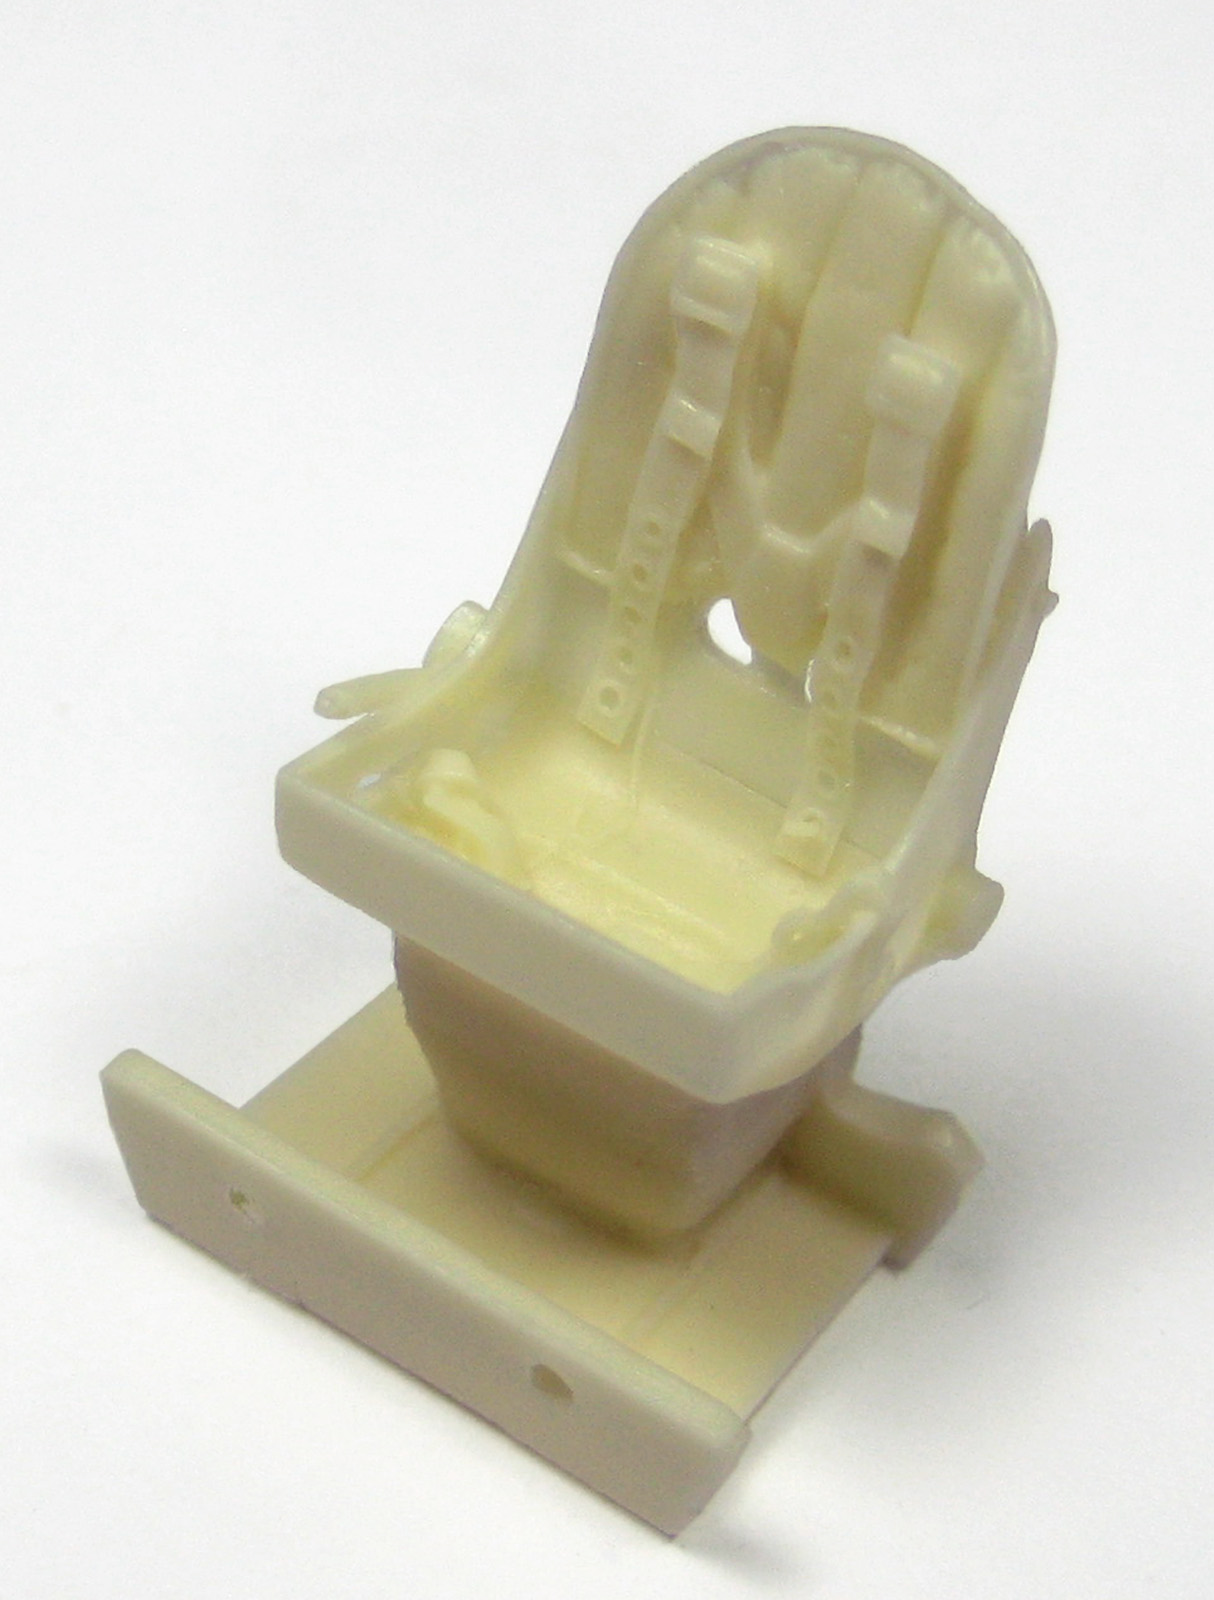
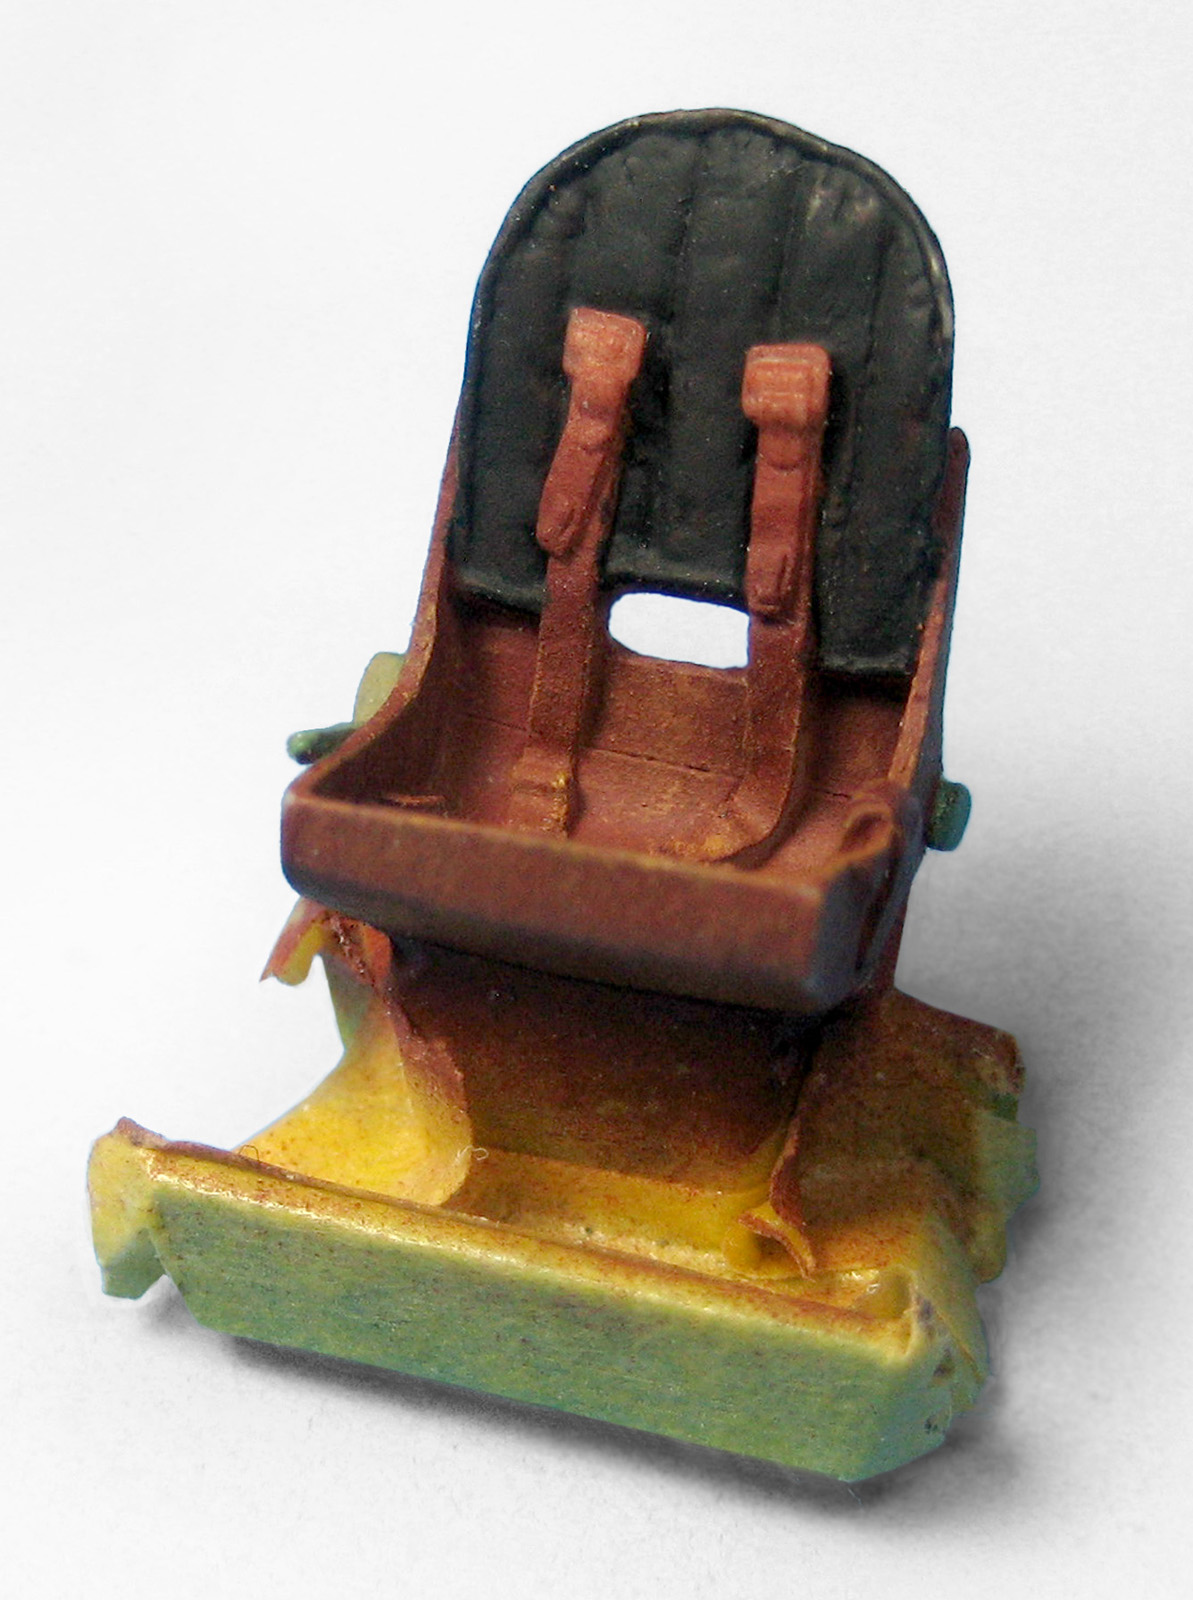
Molded in belts have the advantage of being pre-installed, and tend to look much more organic and naturally draped. The challenge is painting them to bring out the best of the cast in details. Shown below is the final result of the process I will be describing.

1/48th scale Spitfire seat with early Sutton Harness from Barracuda Studios BR48194 Spitfire IX Cockpit Snapshot Upgrade set.

Once the seat has been removed from the casting block by careful sawing, cleanup up the casting, removing flash from the hole in the seatback (if necessary). You can wash the seat before painting, but we don't use any mold release, so its not necessary. You can prime the seat if you prefer. Some acrylic paints tend to adhere better to primed plastic and resin.
I like to mount parts on a wooden coffee stirring stick to ease handling during painting. You can attach it with a small blob of poster putty such as Blu-tack, or you can secure it with a small drop or two of Super Glue (CA).

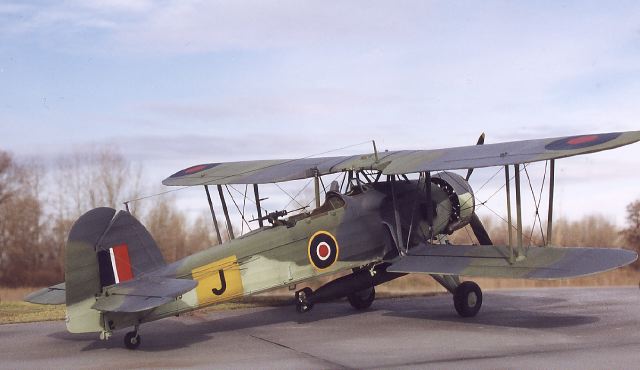
Early Mk I and II Spitfires had metal seats. They could be painted black or Interior Grey Green. Most later Spitfire seats were made of a paper impregnated resin called Tufnol. The resin varied a bit in color, but most were a rich terra cotta color. I find a great match to simulate this finish is Testors Model Master Rust. For this article, I used RAF Interior Grey Green from Akan. It's a reasonably good match, although a bit too warm. I like it because it brush paints well.
 Begin by spraying the seat with Model Master Rust. I thin it with Mr. Color thinner or lacquer thinner to speed the drying time. When this has set, I mix the base color with a little yellow and either stipple or sponge paint the seat. I repeat the process with a slightly darker, browner version of the color. the idea is to end up with a subtle, blotchy looking finish to replicate the look of the original resin seat.
The base and pedestal can then either be masked and sprayed with Interior Grey Green, or brush painted. I actually painted the bases first, then masked and sprayed the seat color. Its a lot more work. Won't do THAT again!

The seat backpad was them brush painted with Vallejo black lightened a bit with Vallejo Khaki. I thin it a little with water to improve flow and prevent obscuring detail. Vallejo paint brushes beautifully.
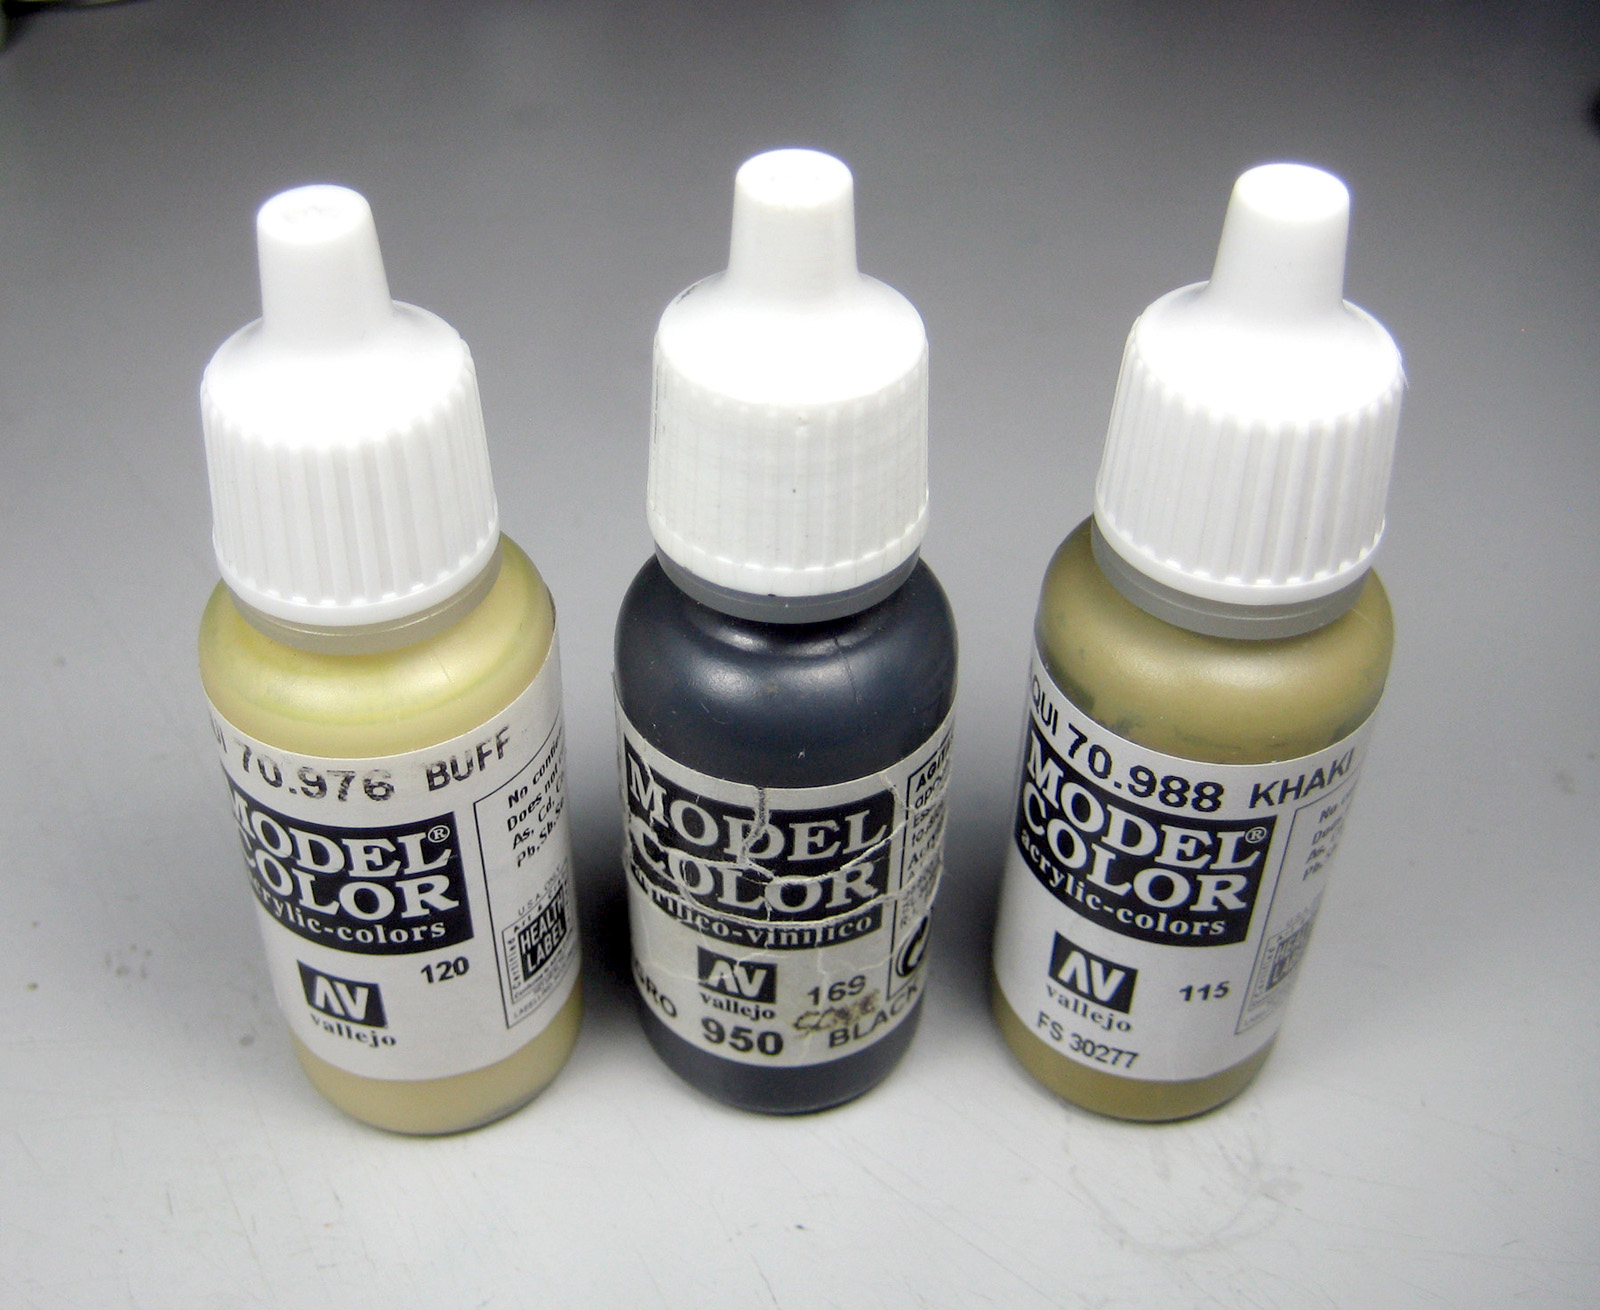
 The only downside is that its bond with plastic is not that good and can be rubbed off corners with too much handling. A sprayed overcoat of future will toughen it up and make it bulletproof! The straps of the Early pin-and-clip style Sutton harness were then carefully brush painted with Vallejo Khaki lightened with Vallejo Buff.
This is where the seat starts coming to life. To really pop out the detail and bring the belts to life, a wash is now applied using my patented ,exclusive, super secret, never-before-seen-on-TV Future Wash.  This is the best was I've ever used on detail areas. It works wonders in gearbays and cockpits and wheel hubs and the like. Its not good for external panel washes, though.

Mix 1 part Future floor wax (now called Pledge Floor Care and by other brand names such as Johnson's Klear overseas.) with 1 part water. Add a small amount of Acrylic black paint (I use Vallejo) and stir to make a very pale wash. Try it on some test pieces. Flood the area with the wash and watch it collect in corners, creating subtle gradated shadows when it dries. The advantage is that the pigment never breaks up like enamel washes do. Experiment with the concentration til you find what works for you. If its too subtle. Go back and apply a second coat once the first has dried.

Paint the pin, clip and grommets with brass paint. I have found that Citadel Runelord Brass has the least grain of all the brass paints I've tried, and it brushes reasonably well. The buckles are then painted with silver, in this case the wonderful (and now extinct) Floquil Old Silver. 
Apply the wash (or whatever wash you prefer) to the seat. Take care to absord excess wash that collects in corners so you don't end up with excessive shading. Like I said, practice of some spare parts and learn the technique. The Future Wash also has the advantage of adding a tough protective coat to the paint. The seat will now be glossy.
The final step is to drybrush the edges of the seat with a light red brown color and the belts with Vallejo Buff The seat backpad can be drybrushed with Vallejo khaki. I add small scratchy lines of Khaki to the backpad to simulate the cracked and abraded black leather that is exposing the undyed hide color below. In this scale, it is pretty small and will probably never be seen, but what the hell. We are having fun, right?

You may notice that the upper harness straps that go over the back of the seat and through the slot in the head armor is missing. This is supplied as a separate part in our upgrade kit and is to be painted with the same techniques. 

The last thing to do is to seal the painted seat with a matt or light satin finish. This seat is destined for an Eduard Mk VIII currently underway on the workbench. As I am a Spitfire nut, four seats were set up and painted all at the same time. I will be glad I did when its time to build some Eduard Mk IXs and XVIs!

Let us know if you enjoyed this tutorial and/or if  learned something from it.

Happy modelling!  Roy

Sunday, May 11, 2014

F4U-1 Birdcage Corsairs Part 2 - Ken Walsh's Viva!

Our interpretation of White 13 "Viva!". VMF-124. Flown by 2nd Lt Kenneth Ambrose Walsh. Henderson Field, Guadalcanal 28 May 1943.


Hi Guys.

As promised, here is part two.

This will be a shorter entry tonight, as I have to get back to the bench. While it at first appears to be a more straightforward scheme, there is some controversy.

This first image seems to show a two tone scheme of Blue Gray (FS35189) over Light Gray (FS36440). The timing of the markings, before the addition of white bars, also point to this scheme. The light colored fin is odd though.

 As with most front line Birdcages,  Walsh's White 13 is quite dirty and fuel stained. Note dirt and paint worn through to bare metal on the wing roots.

This second image of white 13 muddies the water further. At first it appears to be the same aircraft, and it might well be. Some speculation is that this is either a second aircraft, or possiblt the same aircraft at a slightly later date. This images clearly shows differences between the port and starboard fuselage painting. The paint demarcations are very different. There is clearly white on the lower part of the port fuselage in the image below, which is absent on the starboard view above. There is a clear difference between the two upper surface colors in the port view. It also seems to have had the turtledeck modification in this shot. 

The cowling is now conspicuously darker and there is an inscription on the starboard cowl that is unreadable. There is some thinking that this aircraft had been passed on to another pilot or even a new squadron, and this new personal marking was not Walsh's.

 If anyone has a picture showing the later inscription on the port cowling, please share! Images courtesy of Jonathan Strickland.

Unfortunately, there were not a lot of photos taken of the island based Birdcages as the conditions were primitive as can be (no Ginger or Maryann anywhere to be found!), and records on the evolution of camouflage and markings can be a bit confusing. We are starting to understand the theatre and era a little better these days, with some great new research being done by the likes of Dana Bell.

This plan view shows our interpretation of this scheme.

In the end, its up to the modeler to decide how to paint this aircraft. We are supplying this information in hopes that it will spur new discoveries and a better understanding of this interesting period of US Naval Aviation.

As with White 126 from the previous blog entry, this scheme was first presented on our earlier, and now sold out, F4U-1 Corsairs Part 1 in 1/72nd and 1/48th scales. The other four schemes on this new Birdcage sheet are new to BarracudaCals. We hope you enjoy using them.

Happy modelling!  Roy


Saturday, May 10, 2014

F4U-1 Birdcage Corsairs Part 1 - White 126 Research

F4U-1 Corsair. Bu no. unknown. “Tojo Eats Shit!” VMF-222. Pilot unknown. Munda Airfield, New Georgia. Solomon Islands. The inscription was carried on the starboard side. Port side inscription is speculative.

Hi Guys.

I will spare you the explanations for the lack of blogging on my part. Same reasons as listed before! :-)

Last week saw the release of the new sheet from BarracudaCals featuring 6 Birdcage Corsairs. Fans of our decals and the Corsair will recognize that 2 of the schemes, White 126 and White 13, have been revived from the now out of print BarracudaCals sheet F4U-1 Corsairs part 1. This sheet was only released in 1/72 and 1/48 scale. It has since sold out in both scales.

The release of the incredible 1/32nd Birdcage Corsair kit by Tamiya precipitated a new birdcage decal sheet and it only seems natural to release it in all 3 scales as Tamiya has a superb Birdcage kit in each.

When we first released White 126, we had no idea as to where it was based, or from what squadron. Quite a while after its release, a sharp eyed customer emailed me, and through some clever sleuthing, gave us the location and squadron. It had been speculated by some that this may have been a Stateside training squadron aircraft. To me, that seemed unlikely, as the nose inscription seemed a bit risque for an aircraft that could be seen by high ranking personnel.

I think you will be hard pressed to come up with a more dirty, weather beaten Corsair than White 126. Note mismatched tires. Makes a great modelling subject, don't you think?

The modeller who emailed me identified the base and squadron by the Island and the derrick visible in the background. The base was Munda Airfield in the Solomon Islands. Very exciting, as this put White 126 in the front lines. Study of other aircraft from this Squadron show the national markings in all six positions and with the field applied bars.

An interesting story about the inscription. When my friend Kerry Carlyle from New Zealand sent me the image of this aircraft, we could not read the name. it was too blurry. I blew it up in Photoshop and tried a number of tricks to allow it to be read. I increased the contrast, sharpened it, inverted it (to look like a negative), but all to no avail. I sent out the enlarged image cropped and sharpened to a number of friends. No one could read it.  See below:


Cropped, sharpened and with blown out contrast, the name seems easily readable. But before we figured it out, it stumped six sharp eyed modelers!

Kerry emailed me back a few days later to tell me that he showed it to a friend who took one look and said "It says TOJO EATS SHIT!" Of course, as soon as you know what it says, it becomes immediately apparent that that is exactly what it says. But there were six of us staring at that image trying to figure it out. Now it seems hard to imagine that we couldn't decipher it.

Now, the color scheme was a bit of a puzzle at first. It certainly seems to be a early two tone scheme of Blue Gray (FS35189) over Light Gray (FS36440). The timing of the markings also point to this scheme. But then there is the outer wing undersurfaces, which are clearly Blue Grey. Then what is the dark color on the leading edge of the wings? This led to speculation of it being a very dirty 3 tone scheme. 

Plan view, showing the application of repair paint. Click on images for a larger version.

The answer came a few months ago in a online discussion. At about this time of the war, the Birdcages were having problem with the leaking fuel tanks in the leading edge of the outer wings. The tanks were removed and sealed and the repaired areas were repainted in the new darker blue color of Non Specular Sea Blue, or a field mixed equivalent version of this color. The crew obviously also took the opportunity to repaint the now coral blasted wing and tailplane leading edges with the fresh paint. This repair is seen in photos of other Birdcage Corsairs of the time. what is interesting also is that the fin appears to be light grey. Certainly non-standard for the time.

What is also apparent is that this scheme is an extremely war weary paintjob. This can only be a two tone scheme, as there would not have been time for a three tone scheme to get this badly worn and faded on a frontline Birdcage. This makes "Tojo" and extremely interesting subject to model. Its almost impossible to weather this one up too much! 

Hope you found this article to be useful. Part 2 of this reference series will be coming tomorrow.

Happy modelling!  Roy


Monday, August 26, 2013

F4U Corsair Cockpit Stencils PDF Now Online!

A meticulously restored F4U-1D Corsair cockpit shows just some of the many stencils and placards that litter the cockpit. Our new stencil set will add life and interest to an already beautiful cockpit.

Hi Guys.

Another quick note to let you know that the Corsair stencils and placards instructions are now finished and uploaded to the Barracuda Studios website. Everyone who pre-ordered this set, and those of you who bought them in person at the IPMS nationals earlier this month have gotten instructions that did not include placement diagrams. This problem has now been remedied.

Click on the link below and scroll down to near the bottom of the page. Between the product description and the price is a link to a PDF. Click on that link. Print the pages and Bob, as they say, is your uncle.


Note that there are some decals on the sheet that cover different wartime versions of the F4U, and not all of the decals will be used on your model. Not that you can't use them if you like! There are even a few stencils only found in warbirds, and these are noted on the sheet.

Remember, these decals are TINY! Work slowly and carefully. For some of the bigger decals, you might want to cut them into smaller parts and apply them one at a time. In the end, I'm sure they will make a huge improvement in your Corsair model, surely bringing you a Best Of Show award at the next model contest (your mileage may vary!) and the admiration of fellow modelers. :-)

Finally, I'd love to see your work. Send me pics of your stencil sets (or any of the other new sets) installed in your model. Email me at:

barracudacomments@gmail.com

Happy modelling!  Roy

Sunday, August 25, 2013

Hell Hawks and Corsairs and Tempests... OH MY!

The long awaited Thunderbolts of the Hell Hawks sheet in 1/48 is finally available! Featuring over 21 aircraft, 19 of which have never been done in decal form before.

Hi Guys.

Just a quick update today. A full show report and commentary will follow. But for today, a little news update for our customers.

The nationals was a great show, and I am still trying to dig out of the vast pile of orders and emails that piled up while I was gone.

Those that have purchased the new Hell Hawks decal sheet will find that the printed instructions are very basic. The full instructions, which are quite exhaustive, will comprise 26 pages. It was decided that this was too much to include with a decal sheet. It would have pushed the price up by at least 8 dollars. making the sheet over 32 US dollars.

What we decided to do was to make the instructions available as a free PDF download. You can print the entire booklet, or just the pages that you need. There is a link inside the decal sheet instruction sheet to the site where the download can be found.

Don, the artist and researcher who is doing this, is working hard on it and hopes to have it done and uploaded sometime this week. I will make an announcement when it is up. Sorry to keep you waiting. As you know, August is the month when most folks take their vacations, so many things slow to a crawl till the month has played out.  Hey, where's MY holiday? :-)

A closeup of some of the Corsair cockpit stencils to show the level of research and fine detail represented on this sheet. They are are really tiny, but , like the P-51D cockpit stencil sheet, 
will really bring your cockpit to life!


As to the Corsair stencil decal instructions, that one's my fault. I am in the final stages of laying this out. It will go up as a PDF download (nice and big) on the website, at the bottom of the product page just below the price. Stop back later today and you should find it there, ready to download.


Working hard to get caught up on orders. We should be there by Wednesday latest.

Happy modelling!  Roy

Tuesday, May 21, 2013

Coming soon! 1/48 Special Hobby Firefly Mk. I

Borrowed from my good friends at Aeroscale, here is a shot of the forthcoming Special Hobby Firefly in 1/48th scale.

This is good news for lovers of the Fairey Firefly. Apparently, a whole family of Fireflies is coming soon from Special Hobby. This shot is of an early production Firefly I with unfaired long barrel cannons and the early low profile windscreen. While the Grand phoenix firefly is still a nice kit, the special hobby kit sports much finer panel lines, which were my only real complaint about the kit, other than the few parts I made resin replacements for, such as the prop and spinner, the mainwheels (two styles), the cannon barrels (both long and short) and the replacement vac canopy.


The good new for modelers is that the BarracudaCast sets will also upgrade this new SH kit. The kit prop blades are a big improvement over the GP blades, but are still a little thick looking and lacking in outline accuracy. The mainwheels shown are the later 4 slot wheels as fitted postwar to all variants of the Firefly, but they have mixed up the wheel and tire, putting the balloon tire from the early 5 spoke wheel onto the 4 slot hub, which never happened. Finally, the vac canopy should be very useful to anyone who intends to display their model with the canopies open, or just for those who want thinner and distortion free clear parts.

Right now, the vac canopies are out of stock, but a fresh batch is coming shortly. 

I can't wait to pick up one of these new kits. Its a great time to be a modeler of British and especially Fleet Air Arm subjects!

Here is a link to the 1/48th scale page from the Barracuda website. The first 5 products are for the Firefly.


Happy modelling!  Roy


Sunday, April 7, 2013

Eduard's New Spitfire Mk. IXc in 1/48th scale


Hi Guys.

Yes, once again its been quite a long silence here on the blog. I am trying to rectify this and am planning at least a once a week update. There is just SO much other stuff to do! 

We have been very busy, as you can see by the pretty active release schedule we have maintained for the last 6 months. This will continue into the foreseeable future, and the backlog of almost-ready-to-go products is getting bigger all the time. There are about 40 products approaching release, and the only holdup is the time necessary to get them into production. It takes a lot of work to get a single product from concept to in stock status! And despite my lamentations, there is still only 24 hours in a day!

Now, on to the subject at hand.

For as long as I can remember, the Spitfire VIII and IX series has not been properly served in 1/48th scale. Back about ten years ago, Hasegawa gave us a newly tooled Spit IX which set new standards in quality and detail, but unfortunately suffered from an underscale (not short) fuselage. ICM was next with a very nice kit of the Mk IX. It was much better shape-wise and very detailed (with a complete engine compartment), but over engineered and suffering from some nasty shrink marks, poor decals, and crappy open ended, crush insistent boxes that actually concentrate and focus gravity waves (the science is very complex, so you'll have to take my word for it...) to ensure that the boxes end up smooshed.

Now, Eduard have released what is looking to be the closest thing to a perfect 1/48th scale kit Spit IX right out of the box. A full review will follow once the kit has arrived and I've had time to slobber all over it, but from what I've seen and read, its designed using excellent drawings and the molding looks beautiful.

The one comment I've heard, and seems to be backed up by photos, is that the roundels on the kit sheet are a bit brightly colored. Fortunately, there are plenty of aftermarket decals available for this kit.

And, what's this?? Why, Barracuda Studios just happens to have 2 very nice decal sheets just perfect for this new kit! While both sheets are now sold out in 1/32nd and 1/72nd scale, both are still available in 1/48th scale, but with the release of this new kit, will probably not remain in stock for too much longer. If you are looking for some interesting alternate schemes to the kit decals, you might find these interesting.

BC48004 Spitfire Mk. IX Series - Part 1 - 1/48 Scale


BC48008 Spitfire Mk. VIII - Part 1 - 1/48 Scale
http://barracudacals.com/proddetail.php?prod=BC48008

More 1/48th Spitfire flavored products are in development and will be available soon!

Happy modelling!  Roy

Tuesday, November 13, 2012

Kicking Back and Relaxing for a Few Days

The weeks leading up to a big show can be extremely stressful, involving long days and little sleep in preparation for the event. Telford is the biggest show of the year, and the biggest pain to get ready for, as I have to pack up half my business and take it with me. Makes for some ponderous travel.

The show is over, and I'm finally working on catching up on my sleep and getting past my jet lag, only to do it all over again shortly in the other direction.

A funny anecdote. After posting my last blog from the hotel lobby, I went off to have coffee with the boys from Pittsburgh IPMS. While we were having coffee, Bill Dedig was reading my new blog post about me having coffee with them! Disaster was averted somehow, as the incident failed to rip a hole in the fabric of the space/time continuum.

I look forward to getting home and reading up on others experiences of the show, and seeing pictures of the competition models. I had very little time to wander around, as I was either talking with customers, or talking with other people in the business. Really enjoyed myself, despite the rocky start.

I promise to post some pics from the show and blog more about it when I get home.  Thanks to all who stopped by to say hello. Thanks to all for the kind words and ideas and thoughts for future projects and directions.

Now, I am going to get back to my micro-vacation (holiday) already in progress.

Happy modelling!  Roy

Monday, November 12, 2012

Post Show Post Mortem

Hi Guys.

Another quick blog to catch you up on whats been going on with the man from BS.

I am in the hotel lobby fighting with this funny UK keyboard. Some of the keys are in different positions, and I keep mistyping caps like this:  |telford.  Arrrgh. :-)

The show wrapped up at 4PM yesterday. It is amazing to me how quickly it can go from bustling show to empty hall. It was a great show, and I had the pleasure of meeting and catching up with old friends and new. Made some great new connections that should translate into some interesting products down the road. More details of the show later.

My product showed up finally, and we started setting up at 1PM on Saturday. It was crazy for about 2 solid hours as modelers were grabbing product as we were pulling it out of the boxes! The show went well for us, and the new Blenheim wheels (which some have questioned as extremely esoteric and coming from out of the blue) went very well.

Anyway, lots to fill you in on later when I have more time. I am now off to have coffee with Hyperscalers Barry Numeric and Bill Dedig. More soon with pictures from the show.

Happy modelling!  Roy

Saturday, November 10, 2012

The Case of the Missing Case

Hi guys,

If you have been following the Blog for the last few posts, you will recall that a dramatic setback, in the form of all of my product for the show being lost (creatively routed as the airlines might like to describe it) in transit, had beset my best laid plans.

I arrived in Birmingham Airport yesterday afternoon to find that my bag with all my resin had not arrived. I filed a report with the airlines. As of 8PM last night, Air France could find no trace of it. I was becoming resigned to thinking it was gone, and unlikely to be recovered.

After a good solid eight and a half hours of badly needed sleep, I called the airlines to see if there was any news. I was greatly relieved to hear that they had located the bag and would be sending it on to the hotel as soon as possible.

I went over to the exhibition hall, set up what little I could, then decided to take some time and walk around and see the show as a civilian for an hour or two. Rarely get a chance to do this anymore. I can't post images right now, as the card reader on this computer does not seem to be working. I will post in more detail on the show later on.

Long story short, the bag arrived at the hotel around 12:30. I ran over (literally) to pick it up. I got back and the Barracuda Studios stand became a hive of activity as myself and my very good friends Lee Coll, Robin Powell and Linda frantically tried to get the stand stocked, while enthusiastic modelers swarmed the stand. It was about 2 hours of very intense model related fun.

Well, thats about all for now. I have some friends waiting down in the bar, and there is a beer or two with my name on it.

Happy modeling!  Roy


Friday, November 9, 2012

Barracuda Studios arrives in one piece!

with one important caveat.

I am at Birmingham airport, waiting for my friends Robin and Linda to pick me up. Flights were fine... BUT!

One of my bags did not arrive. You have two guesses what the missing bag contains, and the first guess doesn't count.

Not sure when it went astray, but the Airline is saying that hopefully I will have it before the end of the day. Possibly tomorrow morning.

Now the show STARTS tomorrow morning. No point in getting wound up about it, although its going to be a pretty awful show business-wise if it doesn't arrive in time.

Here's some shots of the A380 what brought me here. Nice airplane, and Air France does a great job with food and service. No charges for beer, wine, champagne.

That's all for now. More news as it happens!

Happy modelling! Roy

Thursday, November 8, 2012

On the big silver bird!

Well, I'm at LAX, waiting for this A380 to finish boarding.

Heading across the pond. I'll be in Telford tomorrow. Hope to see those you attending on Saturday at the convention center.

Will try to blog again at the show, but I'll have to hop on someone's computer with Internet access.

Gotta fly... Literally!

Happy modeling. Roy

Tuesday, November 6, 2012

Barracuda Studios Downsizing... Mustang Parts that is!

Ron O'Neal's superb 1/32nd scale Tamiya P-51D Mustang serves as eye candy to help announce the new P-51 wheel sets in 1/48th scale.

Hi Guys.

That scary title is nothing to worry about. We are just releasing P-51 Mustang mainwheels in 1/48th scale. Two styles with different tread patterns. More info below...

A real quick update tonight as I have way too much to do still before I jump on an airplane bound for the UK. A bit too stressed and short on time right now for more, so.... I will supply you with a link to an excellent website run by my friend Adam Norenberg that has just posted the information I'd like to share with you, soooooo.... without further ado (what IS that anyway? I don't recall getting any "ado" before this!), here's The Modelling News.


Happy modelling!  Roy

Monday, November 5, 2012

Bristol Blenheim gets some Long Overdue Attention!

This classic air to air shot of the Blenheim I shows its unique and (to some) attractive lines.

Hi Guys. I have really been lax about posting here on the blog. It takes time and energy, and I have been pretty busy keeping this ship afloat and moving forward in the last 6 months. Still, I enjoy writing for it, and I must make a real effort to make this a more regular thing.

Now, the Scale Model World 2012 show in Telford, UK is this weekend, and time is very short, so I will keep this brief. If you have never been to this.... blah blah blah. GO! It's great. It's huge. It's model-tastic.

Barracuda Studios will be there at our booth and we invite you to stop by and heap praise on us and drop some serious coin while you are at it. My good friend Lee Coll will be there with me, working the table and charming the ladies. Speaking of Lee, we have a couple of new products with a Blenheim-y flavor to discuss. Lee mastered these new parts and they are really beautiful. They certainly fill a big need for fans of this Bristol twin.


The first of these is BR72057 Bristol Blenheim Mk I-V Mainwheels. These new resin wheels replace the undersized and inaccurate main wheels found in any 1/72 Blenheim kit currently available. Below, you can see the new resin wheel compared to the mainwheels found in the very nice Special Hobby family of Blenheims. These new wheels are designed from photos and measurements of surviving Blenheim mains, and are detailed down to the raised logos on the tires. A simple, cheap and very noticeable upgrade for all of your Blenheim kits. Also notable as our first of many resin sets in 1/72nd scale.


The second set is BR48058 Bristol Blenheim Mk. I-V Mainwheels, this time in 1/48th scale. These new resin wheels replace the undersized and inaccurate main wheels found in the Classic Airframes Blenheim I, IV and V kits. They will also work for the old Arba (Jaguar) resin Mk IV as well as any vac kits you may feel crazy enough to tackle. 


Below, you can see the new resin wheel compared to the tiny mainwheels found in the Classic Airframes family of Blenheims. These new wheels are designed from photos and measurements of surviving Blenheim mains, and are detailed down to the raised logos on the tires. They are the correct diameter and proportions. Yes, the tire was that big compared to the hubs! Some minor work will be necessary to make them fit to the gearlegs, but the result will be worth it.


More new release info later today, with 2 new products for the P-51 Mustang in /48th scale. Back to the bench!

Happy modelling!  Roy

Saturday, June 9, 2012

Best British Fleet Air Arm Aircraft Award!

Jens Haakon Brandl's beautiful Seafire FR 47 in 1/48th scale from the Airfix kit is a great example of a beautiful model built to a Fleet Air Arm theme.

Hi Guys.

Barracuda Studios is proud to announce the return of our special theme award, presented by us at the IPMS/USA National Convention, being held this year in Orlando, Florida during early August. That gives you about 2 months to get something together if you plan to compete.

The rules are simple.

  1. The subject must be an aircraft (yes, we will even allow those odd looking contraptions with the propeller on top!) model.
  2. The subject must be a British designed and built aircraft. No lend lease aircraft such as Hellcats, Avengers, Wildcats and the like. Spey-engined Phantoms are OK, as they are a very different animal that only served with the British. Why? because I want to see something different from the usual remarked Hellcat!
  3. The model can be any scale and media. It can be from any era, from the FAA's inception in 1924 to the current day. It must be in RN Fleet Air Arm Markings. No Ethiopian Fireflies please.
  4. The judging will be performed by an experienced 3 man team consisting of myself and 2 others of my choosing. Judging will be to IPMS standards. In other words, all the detail and fancy paintwork in the world won't help you if you have basic assembly and finish problems such as silvered decals, seams showing, misaligned components, etc.
  5. No full time Barracuda Studios employees are eligible to compete. That means I cannot enter. Dang!
  6. You do not have to use any Barracuda or Cooper parts or decals in your build, and no special consideration will be given if you do. Bribes are another matter! :-)
Contact us if you have any questions about eligibility.

Ian Robertson's beautiful Fairey Swordfish in 1/48th scale was built from the superb Tamiya kit.

Just about 2 months til the show, so you better get building! Not enough time for you? Build at a Geologic pace? No worries, mate! We will be sponsoring this trophy again next year in Loveland, Colorado.

The trophy will be presented at the show, and will be something pretty special. Previous awards were well received, back in the Cooper Details days.

This is a category that used to be a bit of a challenge to build for, as the amount of really nice kits was very limited, but the last 5 years or so have seen a proliferation of really nice kits of a wide variety of FAA subjects, so I expect to see some nice work.

OK. GO! ...What are you still doing here? The clock, she is a-ticking! That model ain't gonna build itself, you know.  :-)

Happy modelling!  Roy


Tuesday, May 29, 2012

The P-40K in 1/32nd Scale is Back!

Hasegawa has just re-released their beautiful Warhawk kit in 1/32. This
new boxing has parts for both the P-40E and filleted tail for the P-40K.

Hi Guys.

 The Hasegawa P-40K was only available for a short time when it was initially released a few years ago. As with most Hasegawa kits, the decals that come with the kits are well researched and beautifully printed, but are very thick and sometimes difficult to work with.

Barracuda Studios followed up the release of this kit with a dedicated P-40K decal sheet in 1/32nd scale. It may well still be the only aftermarket decal sheet available for the filleted K model Warhawk. The sheet contains markings for 3 interesting and important aircraft.


Curtiss P-40K Warhawk “White 13” 
64th FS/57th FG. Flown by 1st Lieutenant Robert Johnson ‘Jay’ Overcash
Based at Hadi Main, Tunisia. May, 1943.

Curtiss P-40K-1 Warhawk “White 171”
75th FS/23rd FG; Flown by Major Elmer Richardson
Hengyang, China. Late 1943

Curtiss P-40K-1 Warhawk “White 29”
7th FS/ 49th FG; Flown by 2nd Lieutenant Arland Stanton
Port Moresby, New Guinea. March 1943

Overcash's P-40 White 13 has been done before in decal form, but this is the first time that the markings have been complete and correct. Note the Fez on the rudder with the inscription SAVOY, and the unique scorpion marking on the nose, which is different from all the other similar markings on aircraft in this squadron.


Note the morse code "three dots and a dash" signifying V for Victory and the white outlined black scorpion on the nose. The detailed and decidedly evil looking skull and 5 swastikas under the windscreen round out Overcash's personal markings. The dull, dusty, sandblasted camouflage of Sand over Neutral grey makes this a very different and interesting P-40. 


Just a heads up for those of you who have been lamenting the lack of availablity of the 32nd Hasegawa P-40K. It's back, and the decals are here, waiting for you! They won't be here forever. Once they are sold out, they are gone for good, then you will have to pay some yahoo on eBay $395 for the sheet. Don't say I didn't warn you. :-)

Another blog update will be posted here tomorrow. It will be announcing the start of presales of 5 new products from Barracuda Studios. Yup. For reals!  This will be followed by another batch of new products in about 3 weeks. 

Happy modelling!  Roy


Thursday, May 17, 2012

A Great New Feature on the Website!

Its true, Barry! Barracuda Studios now takes Plastic.

Yes, in addition to Paypal payments, we now accept Visa, Mastercard, Amex and Discover... just... like... before! So, whats the big news? 

Well it seems that the credit card payment option was not very obvious, and many have missed it.

On the home page, we have now added a little graphic showing that we take credit cards. Underneath it, there is a link in blue stating: Click for more information. Guess what you do next? Yes! Right! You click on that link and it takes you to this page:


This will walk you through the very easy credit card payment protocol. Please note that you do NOT need to have a Paypal account in order to pay via credit cards. Our shopping cart is encrypted and secure. Shop with confidence. Your credit card company also has you covered for anything nasty that could possibly happen. But relax, we have completed thousands of transactions without a problem. If you ever have a problem, email us and we will do whatever we can to get it resolved. We stand behind our products, which is probably not a good idea if you work for a company that makes wood chippers or jet engines.  

Also, please be aware that we now can accept most credit cards in person at shows, so if you are a little short on cash, no worries!

Finally, a quick note about new releases. We have 5 new 1/32nd products that will be going up for presale in the next few days. There are a whole pile of 1/48th scale products coming in early June, and the Hell Hawks decals in all 3 major scales are coming soon as well.

Thanks for stopping by, and happy modelling!  Roy


Wednesday, May 9, 2012

Important news regarding 1/32 P-51 Cockpit sidewall set

BR32012 P-51 Mustang Cockpit Sidewall set.


Hi Guys.


It has come to my attention in the last few days that the installation instructions for the above mentioned BarracudaCast set are missing an important assembly note.


The kit cockpit floor needs to be slightly modified to fit to the new resin starboard sidewall properly. Without the modification, the fuselage sidewalls will be spread too wide, leading to problems when installing the wings.


The above image shows the extent of the modification to the kit floor.

The modification is quite simple and can be done with side cutters and a sanding stick in about 3-5 minutes. Just test fit the sidewall as you go, when the ribs on the sidewall meet with the bottom of the slots in the floor, you are done. You might want to slightly bevel the edge by scraping with a hobby knife to impart a slight radius to the top edge. Easy peasy.

The rest of the installation then follows the installation instructions for the Barracuda sidewalls and then back to Tamiya's kit instructions.

This view shows the modification complete and the two parts assembled.

What to do if you already have the fuselage assembled

If you have already past this point, do not panic. With some careful work, you can fix the resultant fit problem. Carefully mask off and cut along the line shown in the figure below. This may take a few minutes. Work carefully and slowly. When you get close to cutting through, you may wish to switch to a hobby knife and carefully score repeatedly until you just break through. Carefully break free the purple section and gently carve away any excess plastic until the ribs on the sidewall fit all the way into the slots on the kit floor.


You can download the complete instructions, including the addendum on the Barracuda Studios website. The link can be found on the P-51 Cockpit Sidewall product page, near the bottom of the page.


We pride ourselves on producing parts that fit, and we hope that this correction will allow anyone who has already assembled the fuselage to get the build back on track so that you can enjoy the superb engineering of Tamiya's gorgeous P-51D Mustang. For those of you who haven't started yet... what are you waiting for?

Happy modelling!  Roy


Monday, April 16, 2012

Barracuda Studios Enters the Great War!

The modelling public is gobsmacked by our new direction, but fear not, we have not turned our back on WWII subjects.

Helloooooo modellers.

We are proud to announce that we have two new products up on the website and available for sale now. It is our first foray into the Great War. To paraphrase Yoda: Great War? Wars not make one great! Yes.....

Wing Nut Wings turned the modelling world on its head a few years ago with the launch of a growing line of absolutely heart stoppingly beautiful kits of World War One aircraft in 1/32nd scale. They are not only state of the art, but they have set new standards for quality, detail and accuracy.

So why are we doing parts for them? Because, like the Tamiya 1/32nd kits, there are always things that can't be done in injection molding, and many of us love to gild the lily. So, in that spirit, here are two new products that will help you make your masterpiece, even more masterpiece-ier. If that's not a word, it should be. Here's what we have wrought, or more accurately, my good friend Mike Braun, who did the lovely masters, has wrought:

BR32021 Pfalz D.XII Late Exhaust Price $6.95

This super-detailed resin exhaust manifold directly replaces the kit exhaust manifold in the gorgeous1/32nd scale WNW Pfalz. D.XII. Once removed from its casting block, it directly replaces the kit part. It has been upgraded with the addition of weld beading at the junction of its component parts, and the opening has been deeply hollowed out for a more scale appearance. A very quick and easy upgrade to your late production Pfalz model.


BR32020 Mercedes D.III/D.IIIa Intake Manifold Price: $7.95


This simple two part resin upgrade set replaces the kit intake manifolds for the following kits:Roland D.IVa, Pfalz D.III, Pfalz D.IIIa, Albatros D.V and D.Va, Pfalz D.XII, Fokker D.VII. The parts are designed specifically for the above listed WNW kits in 1/32nd scale, but will work with Roden and others with a small amount of modification. The manifold has been detailed to include the asbestos cord insulation wrapped around the intake pipes. The sheet metal shielding has also been modelled and the mounting clamps are petitely reproduced. Castellated couplings, and additional details round out this simple upgrade. Once removed from its casting block, it is a drop fit for the original kit part. A quick and easy upgrade that will add a lot of detail to the already beautiful engine in these amazing kits.


We are accepting orders now, and will begin shipping by Wednesday. More resin is likely for this series of kits, depending, of course, on the popularity of these sets.

The onslaught of resin will continue shortly, with a number of releases in 1/48th scale, and more resin for the Tamiya P-51D Mustang including FOUR sets of new resin tires with different tread patterns.

For those of you that remember the old Cooper Details days, relax. We have not forsaken our first love. There are a number of 1/72nd scale sets in the pipeline. The next few months are going to see a definite upturn in the release of new resin for all scales.

Better get back to the workbench. This stuff ain't gonna do itself.... although it would be great if it did!

Happy modelling! Roy